Showing posts with label howto. Show all posts

Host ASP.NET or c# websites for free of cost

Think it is a fake title? , No its not. because you can host your ASP.NET or c# website for free. Wonder How? . Dont worry, here is the complete guide for hosting your website.

First things first, Most of you might probably know about ASP.NET or c#. But for those who dont, here is an Introduction.

ASP.NET or c# is mainly used for designing websites. Unlike php or any other languages, c# coding is done using Microsoft Visual Studio.  We can easily do the designing by its drag and drop facility. Also ASP.NET is secure than languages like php. There are many job opportunities available for ASP.NET. Many computer graduates and post graduates are getting placed in c# programming.

So we have read an introduction about c#. Lets talk about its drawbacks. First and the most important one. You need to pay a good amount of money to host an ASP.NET website. Also there is less hosting providers available than other languages.

So for solving this problem, we are giving a complete guide on, How you can host your ASP.NET website for free. First of all, there are many limitations for this free  hosting which i will be explaining later. This hosting is not suitable for professional websites because of these limitations. it is better suitable for Educational purposes.

How to host ASP.NET or c# website for free


We are achieving this by using a website called Somee.com. it is basically a ASP.NET website hosting provider. They offers a free ASP.NET hosting plan. Some of the notable features of their free .NET hosting plan is given below
  • Single web domain
  • 150 MB storage capacity
  • 5 GB Monthly transfer
  • 15 MB MS SQL Database size
  • 20 MB MS SQL Log size
  • 40 MB Backup storage size
  • Forced Advertising
  • Can use your own Domains

Somee puts a banner advertisement at the bottom of every page and a small hyperlink ad as well. You can see it in the screenshot attached at the end of the post. Now Lets see how to create and host a .NET website using somee

Steps to Host .NET website in Somee.com


  • Goto Somee.com and click on the Learn more button under free .NET hosting
free asp.net hosting

  • On the next page Click on Order now button under Free hosting package
free web hosting

  • Now fill the Registration form and click on Register new Account
free hosting

  • They will send a validation code to the email you have given during the registration. Check your email and enter the validation code in the next page
asp net free hosting

  • After confirming the validation code , Login to your somee account and you can see a checkout page like below screenshot. Click on Checkout
free net hosting with sql

  • You will be redirected to 'Create website' page. Fill the details of the website you are about to create and click on Create website. You have to remember the name you give to your website, Suppose you enter your website name as example, Then your website domain will be example.somee.com
host asp.net website free somee.com

  • On the next page you can see a message saying Your website was Created successfully. Click on Manage website at the bottom of the page
how to host in somee.com

  • Click on File Manager from the left menu. Now you can see the files in your directory. Default.aspx is the one that executes first. Delete all the files in your directory.
  • Click on upload and Select all the files required for your website. it includes all the .aspx, .aspx.cs and web_config files and click on Upload files
free c# websites hosting lifetime

  • Now you can access your default.aspx file by visiting your website url
  • Thats it. You have succesfully hosted your asp.net website without paying a single penny.
Now, This is the screenshot of a simple asp.net page with only a button and a single line of code.


if you have any doubts feel free to ask it in the comments below


Easiest method to type Malayalam in Android

There are different applications available in android for typing different languages. Almost all of them comes with a keypad which contains letters of that language. One problem with using these keypad is, the developers might be able to get all the contents that you type using their keypad. 

There are many softwares available to type malayalam in android devices. I personally used many of them. But none of them gave me a satisfaction, because it is difficult to type in malayalam using those keypads. Also all the letters are not available in most of them. I had to adjust with them by making some changes in the text. I continued my searching to find a good malayalam typing application for my android device.
 
I already knew about the Google handwriting application, which we can use to write the text like in a paper and the application converts it into real text. So, i checked it to know if they support malayalam language. I was happy that they did include malayalam language and i decided to give it a try.

I found it the best way to type malayalam language in android devices. It supports all the letters in malayalam and we can use it easily by handwriting the words. we can use it to type malayalam in any applications include whatsapp, facebook etc. An advantage of google handwriting is that we can write fast comparing to other keypad applications

Type Malayalam in Android


  • Download Google handwriting app from here
  • Open the app and set Google handwriting as the default input method
  • Click on configure languages and deselect the use system language option

  • Select Malayalam from the list. Please note that you might need to download additional content for using malayalam. (Usually less than 10 MB size)


  • Now you can easily type malayalam. You can also switch to other input methods by easily press and holding space key in the Google handwriting space.

Set Whatsapp & Instagram profile pictures without Cropping

Whatsapp and Instagram, both are revolutionary applications in mobile devices. Whatsapp allows chatting through Messages, Voice, Video ,Calls etc. While Instagram allows sharing of images. Both are spectacular android apps for social networking. 

Whatsapp and Instagram allows to set a profile or display picture for every user. You might have noticed that, while setting up a display picture, it asks to crop the picture to fit the size. This might be sometimes frustrating, because a full image will be needed to provide a good profile picture. The reason for this problem is that, both the apps only allow square shaped pictures as its display picture. So they ask you to crop the picture to make it square shaped. So, in this post, i will explain how to set a Whatsapp or Instagram profile picture without cropping the original image
upload profile picture facebook,whatsapp,instagram without cropping

How to set whatsapp & Instagram profile picture without Cropping


We are doing this by converting an image to Square shaped one without losing any image content. Instead of cropping the image, we add an extra portion to the image, to make it Square shaped.

  • Download Squaredroid android app from here
  • Install and open the app
  • Now select Pick a Photo
no crop for whatsapp,instagram,facebook

  • Select the photo you want to set as the Profile or Display picture
  • Click on the save icon on the right top of the screen
post pictures on whatsapp,instagram without cropping

  • Select file type, Quality and size and press ok
upload pictures instagram without cropping

  • That's it. Now you can set this image as the display picture in Whatsapp or Instagram without cropping
display profile picture no cropping

Download files in Mega cloud from Android & PC

If you are reading this post, then probably you might know about Mega cloud storage. For those who don't have basic idea about Mega cloud, I will give you a brief explanation.

Mega is a famous cloud storage service by Mega limited based on New Zealand. Mega is differ from other cloud services because of some advanced features. One of the main features of Mega s that, it uses advanced end-to-end encryption service, which makes the files very secure. Additionally, Mega does not store passwords or master keys. These are both held by the consumer and cannot be recovered by the company.

Another feature is its storage space for free users. They provide 50 GB storage for free users. This can be increased by choosing any of their pro plans. We can also share files using their unique link. But the problem is that, it is difficult to download a file from mega. A new user may find it difficult to download files. Mobile browsers are not supported by Mega websites. So we cant access mega files using a mobile phone.
 
For downloading a file, one have to access mega site using a PC browser or by using their android app. The android app for Mega is available in google play store.

Download Mega files in android


  • Download mega android app apk from here
  • Install the apk
  • Open the app, and Sign up for a new account 
  • Login to the app, and click on the menu icon (Three dotted icon) and select Open link
download file from mega.nz

  • In the next window, copy the link of the file you want to download. And press open
download from mega.nz cloud android

  • Now the file details will be displayed with two options, Import and Download. Import option will import the particular file to your account, so that you can download or use it later. Download option will directly download the file
download files from mega


Download Mega files in PC


We can download Mega files directly through the browser. But probably you will get an error before the download is completed. By using another software, we can download files with the ability to pause, stop, resume etc. The steps are as follows
  • Download Mega downloader for Windows (2 MB)
  • Install Mega downloader in your PC and Open it
  • Now Click on the + icon in the Mega downlader
download mega.nz cloud file from pc

  • Now add the Mega link for the file you want to download,Type the name for the file,Choose the download location and click Add Links
download mega file windows pc

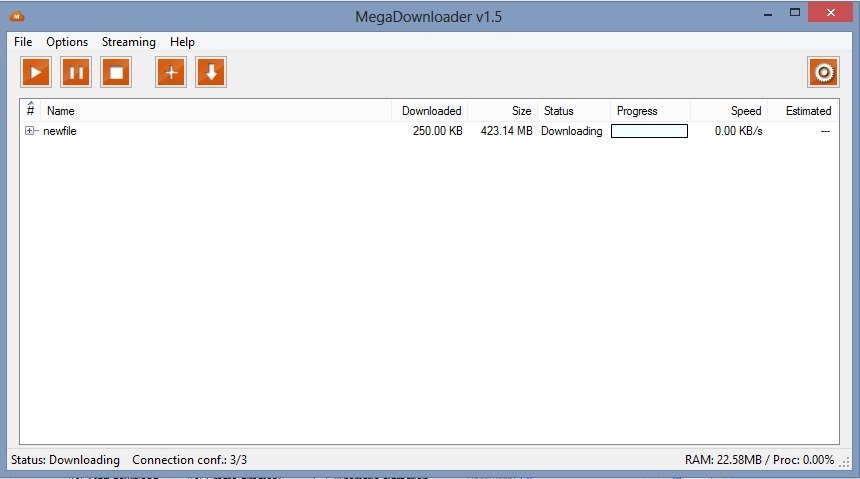
  • Now you can see that the file starts downloading. Hope it helps.
mega downloader

Find Lowest Price of an item from Online stores

Online shopping have seen a huge boost during recent years. Most people who have some basic computer knowledge will prefer online shopping than buying from local stores. There are many factors that attract everyone for shopping online.


  • You don't have to leave home 
  • Can choose your product from a huge variety of items and sites
  • Low price comparing to Local shops
  • Discounts
  • Will be delivered to your Doorstep etc.
The price of a product varies from different e-commerce websites. it is a bit difficult task for a person to check every e-commerce sites to check the lowest price for an item. if you want to buy an item, you have to check go and check price of that product in every site. So that you can buy it from the site which offers Lowest price. 

Find Lowest price of a Product in Online E-commerce websites

Your solution for the above problem is MySmartPrice. You don't have to check every website for finding the lowest price for an item. You just have to visit MySmartPrice and search your product to know the price of that particular product in various e-commerce websites. The prices are updated instantly according to the change in the e-commerce websites. 

  • Visit MySmartPrice . You can see some popular items in the homepage. You can either choose a specific category or search for your product in the search bar.


  • You can apply filters such as price, category in the search results. Here is an Example. I have selected 'Lenovo K3 Note'.
  • We can see the Lowest price for the product in the next page. we can also see the price of the product in different e-commerce websites.


You can also subscribe for the price drop alert, by which you will get email if the price drops for the specific product. MySmartPrice also have android app in Google Play Store.

Transfer files between PC and Android by using Xender

There are many ways to transfer files between your android or windows smartphone to PC. You can use USB cable, Bluetooth etc. By using USB cable, we can transmit data fast. But Bluetooth is not an effective method to transfer data between your smartphone and computer because of its low data
transfer rate.

There is a better way to transfer files wirelessly by using your WiFi. There is no need to have internet in your device or PC. For this you need to have a famous data transfer application named Xender in your smartphone. No specific software is needed in the Computer. For this to work, PC must
have WiFi facility

How to transfer files between PC and smartphone


  • Open Xender in your device
  • Now click on the blue icon

  • Now you can see something like the below screenshot. Click on the PC/MAC option


  • Now select Create Hotspot option

  • Wait until you see a screen like this. Don't close this screen

  • Now turn on your PC WiFi and connect to the WiFi starting with name something like Xender_AP

  • Open any browser in your PC such as Google chrome, Mozilla Firefox etc. 
  • On the Address bar type in the IP address that is shown on the Xender application in your phone. 
  • Now Click on Accept in your Android Device

  • And thats it. Now you can browse and transfer all the files in your android device from your PC. 

Remove Shortcut virus from Computer

Those who frequently use PC or Laptop might know about shortcut virus. They are a real headache. I will explain what is shortcut virus, for those who don't know about it.

it is a virus affecting Microsoft windows operating system. it is normally seen on removable disks or pendrives. When you open a removable disk, it creates a shortcut in the name of the disk and moves all the files inside it. To see the contents of a disk, you have to double click on the shortcut.

Once affected, it will create shortcuts for all the removable disks. if the virus is affected, when you open the drive, you can see a shortcut in the same name as the drive with size of the drive in the brackets.

This virus is a real pain because if affected, it will create shortcuts like this in every removable disk you connect. One serious problem i face is that, whenever i connect my phone to my PC, all the apps in the SD card is removed. And i had to reinstall the apps everytime after connecting to PC.

How to remove Shortcut virus from PC


We can remove the shortcut virus from PC by using a simple tool called Usbfix. we can also use this tool for removing other viruses like Autorun.inf. it is a lite application which sizes only about 2 MB. We can scan the drive or directly remove all the viruses. We can either use it on Removable disk or System hard drive. A main advantage of this software is that, it will not harm any files inside the drives. it will only remove the virus content from the drive.

Steps to remove shortcut virus


  • Download Usbfix from here, and Install it in your PC 
  • if you need to fix your Removable disk, Plug in the drive.
  • Open Usbfix and Click on Research. You can check for virus in the scan results. For that check out your desktop and you can see a notepad file. Open it amd you can see the scanning results. Scroll down to see the infected files and their path.
reove shortcut virus from windows pc

  • For removing the viruses from the drive, Click on Fix from the Usbfix dashboard. After the process is complete, you can check the report from the desktop.


Hope it helps.